A radio-location transmitter, receiver and
associated
loop are described in principle. Constructional details of the
transmitter
and loop are given. A unique feature of this design is the receiver (to
be described in a follow-up article) which allows depth to be
determined
by absolute or relative field strength measurements.
IMPORTANT: There is a simple
modification to this circuit that will boost output and increase
efficiency! This applies to all beacons, regardless of age or the
size of the loop. This modification changes the MOSFET drive from
1/16 to 1/8 duty cycle pulses. First cut the lead that runs
between pin 6 of the 4060 (U1) and pin 1 of the 4073 (U3). Next,
connect pin 1 of U3 to pin 14 of U3 (+9V). The battery current
will increase (up to twice), and the efficiency should rise as much as
15%. No re-tuning is required. If the increased current is
not desired, the loop tap can be moved down to fewer turns.
General
This article gives the construction details of a simple continuous-carrier 3496Hz Cave Radio Beacon designed for use with a very sensitive surface receiver using a narrow-band (1Hz) "double-quadrature" detector of my design. The receiver can also phase-lock on the signal to allow a digital readout of field strength (mainly for quick depth measurement) with an apparent bandwidth of 0.1Hz or less. Detection of successful phase-lock can also set off an alarm to "wake up" the surface operator.
The receiver, which contains no inductors or expensive filters, will be described at the block diagram level in a subsequent article. Both units have been built and used in actual cave locating with excellent results. Changing to another frequency should not be difficult. The original Beacon and Receiver were hand wired using generic Radio Shack PCBs. NOTE: Four Prototype PCBs for both the receiver and transmitter were produced by Ian Drummond. The Beacon boards worked from the beginning and the Receivers worked after some changes in layout. Ian corrected the board layout and produced 20 more sets of boards, all of which have been sold.
Loop Antenna Construction
The rigid loop consists of 19 turns of 12 gauge (2.053mm diameter) solid copper insulated "house" wire 24 inches in diameter. Loops with few turns like this one are rugged, have little shock hazard, and will even work submerged. It is not wound on a form but was simply bent to shape over a circle drawn on my basement floor, then wrapped tightly with plastic electrical tape to keep the inductance from changing. The loop is tapped 3 turns from the battery (Vcc) end.
A thin 0.5 inch wide piece of an epoxy-fibreglass sail batten was wrapped around the outside of the loop and attached with tie-wraps for added rigidity and protection. A separate bubble line-level is used for levelling. A 3-wire cable and plug connects the loop to the electronics, allowing all the capacitors and electronics to be carried in a waterproof container. The loop was originally resonated with 4m F of Radio Shack polyester capacitors which are a bit lossy but are small and cheap. NOTE:The capacitors were recently changed to metalized Polypropylene which are more stable and have much lower loss. Mouser sells some compact and reasonably priced 1 uf 250 volt units. Mylars are still OK for the small capacitors used for final tuning.
Table 1
gives
the electrical parameters of both the resonant circuit and the loop
alone.
Appendix A gives the inductance formula I use.
| Loop Parameter | Direct Lab Measurement | Comments |
| Ls | 492m H | 24 inch loop |
| Xl | 10.8W | |
| Rdc | 0.12W wire resistance | |
| Cres | 4.198m F | polyester (mylar) caps |
| Dcap | .0072 | cap dissipation factor |
| R3500Hz | 0.214W | loop AC series resistance |
| f | 3501Hz | L-C resonance |
| Q | 50 | loop alone |
| Qres | 34.6 | polyester caps |
| Bandwidth | 104Hz | -3dB, includes cap loss |
| Rres | 375W | L-C parallel resonance |
| Rtap | 9W | L-C parallel resonance |
| weight | 4lbs | complete loop |
Transmitter Design
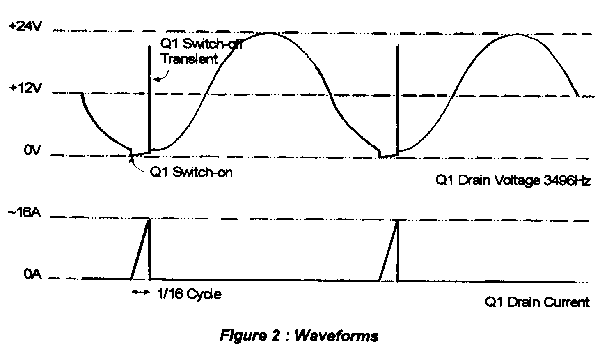
The so called class "E" mode of operation is used to make the transmitter simple and efficient. In class "E" a short pulse of specific duration (dependent on "Q") is applied to the resonant loop at a specific time during each carrier cycle. The loop then "coasts" through the rest of the cycle on its own. For beacon use, a steady 3496Hz signal (derived from a 3.58MHz colour-burst crystal) is transmitted without modulation to allow the narrowest practical bandwidth (1Hz) to be used in the receiver during the search. The receiver identifies the signal by its frequency, which is accurate to .05Hz or better when not phase-locked. CW (Morse Code) can be used for uplink communications using a broader bandwidth mode. Loop current (and voltage) is a reasonably clean sine wave.
Referring to the schematic (Figure 1), U1 contains an oscillator circuit using CMOS gates which drives a 14-stage binary (¸ 2) divider. AND gate U3A forms an 1/8 duty cycle positive pulse train at 6991.3Hz. When keyed, AND gate U3B feeds a 1/16 duty cycle 9V positive pulse train at 3495.65Hz to Q1. U3C doubles the drive current to Q1.
The primary attribute of Q1 is low "on" resistance (.05W ). Any N-channel MOSFET with a rated voltage of 50V or 60V, a continuous current rating of 10A or more, and an "on" resistance of .05W or less should work. The International Rectifier IRLZ34 is a direct substitute. The IRFZ40, IRFZ42, IRFZ44, IRLZ44, or IRFZ46 should all work. Harris has the RFP45N06 and RFP25N06 and Phillips has some also. Switching losses are low due to the low frequency. Only a token heat sink is required. In my unit Q1 is bolted to about two square inches of sheet aluminum.
NOTE: For long term reliability the circuit should be modified to AC-couple the drive to Q1. This will keep Q1 from locking "ON" if the oscillator stops for any reason, such as low battery voltage. Simply wire a 0.1 uf capacitor in series between the driver output (pins 6/10 of U3) and the gate of Q1. Leave R3 wired directly from the gate of Q1 to ground. This modification has no effect on performance.
When properly tuned, Q1 will turn on at the lowest voltage point of the sine wave. As shown in Figure 2, current in Q1 rises rapidly for 1/16 of each carrier cycle then suddenly drops to zero producing a large transient spike which is absorbed by Z1. The net effect is exactly like giving a small push on a child’s swing each time it comes close except here we are causing a resonant circuit to "ring" resulting in a current of about 3.6A RMS in the loop.
For power I usually use a 12V 1.4 amp-hr Gel-Cell. NOTE: Lately I have been using two 6v 4AH batteries in series to allow several longer runs on a single trip. These batteries seem to last indefinitely if they are kept charged when not in use (every few months) and never allowed to remain deeply discharged for more than a few hours. Table 2 gives the measured specifications of this beacon with the 24 inch loop but using an older MOSFET. L1 will only light when the loop is properly connected and actual transmission is occurring. An audio sidetone for CW can easily be added by connecting a pizeo-speaker element (RS 273-073) in series with a 1kW resistor between the drain of Q1 and ground. My unit is housed in a cheap blue plastic box (RS 270-221).
NOTE: I recently
discovered
that some beacons are not happy running from a bench power supply,
even
fancy 3 amp constant voltage/current Lab units! The 1000uf
capacitor
does not totally eliminate the the high current pulses from the power
input
lines. One power supply actually reduced its regulated output
voltage
even though it was set for 3 amps. Two different Wakulla beacons (22
inch
loops) showed greatly reduced output after about 2 minutes of operation
using 2 different power supplies. DC current also increased from ~.52
to
.62 amps when the output dropped! Both beacons work fine on battery
power.
|
|
|
|
|
|
|
|
|
|
|
|
|
|
|
|
|
|
|
|
|
|
|
|
|
|
|
|
|
|
|
|
|
|
|
|
|
|
|
|
| The AC magnetic field generated by this Beacon is safe for people but will quickly erase the magnetic stripes on credit cards, phone cards, etc. I know from personal experience! It will probably damage computer hard drives, floppy disks, audio and video tapes. I now keep my wallet at least 10 feet (3 meters) away from the loop. Also keep the Receive loop at least 10 feet away to prevent Receiver damage from high voltage. |
Tune-up
Tuning is a three step process. First construct the
loop
with its feedline, then resonate it with capacitors C4-C7 before they
are
installed on the circuit board. It may be best to tune slightly above
the
operating frequency so that C8 can be used for final tuning. Next
install
C4-C7 and complete the beacon. Now simply find the value of C8 that
gives
minimum battery current. Fine-tuning can also be done by changing loop
shape. Do not leave the Beacon running for more than a few seconds at a
time until you are near resonance. The MOSFET current soars off
resonance
and could easily overheat. The newer MOSFET's have lower Ron
which helps. This should be close to the point of maximum efficiency.
Note
that maximum output does not occur exactly at minimum current.
To
reduce battery current drain (and output) move the tap up the loop from
3 turns to 4 turns.
Improvements
3496Hz is OK for countries having 60Hz power, with the nearest harmonic being 17Hz away, but is a poor choice for the UK with the nearest harmonic of 50Hz only 4Hz away at 3500Hz. 2-4kHz is an atmospheric noise null. A 3MHz crystal will give 2930Hz which is acceptable for 50Hz areas with the nearest harmonic 20Hz away.
For those looking for the ultimate beacon the
following
comments are offered:
B) A single layer loop winding would increase "Q" and magnetic moment.
C) Shortening or eliminating the loop’s feedline completely would also increase "Q". Mine is 5 feet of 16 gauge 3-conductor wire.
D) Aluminium wire is acceptable for weight reduction in a rigid loop.
E) Installing the tuning capacitors at the loop end of the feedline helps "Q" and allows a 2-wire cable to be used. This is also a good idea if interchangeable loops of different sizes are planned.
F) Use metalized polypropylene capacitors which have 1/10 the loss of polyester units, but are larger and more expensive.
Note: All loop and beacon parameters are defined in Appendix A or B
Appendix A
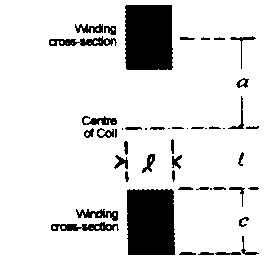
My favourite loop inductance formula works with any antenna from skinny one-turn loops to fat "donuts". The "c" and "l" dimensions are the approximate cross-section of the actual winding. Note that it is not necessary to know the wire gauge. The inductance will change (increase) if the winding is tightly taped after construction. A single layer or any widely spaced winding will give higher "Q" due to reduced proximity effect, but they are harder to build. Ls = series inductance in mH.
![]()
or ![]()
where N = number of turns,![]() = winding width in inches, c = winding thickness in inches, a
= winding radius to centre of cross-section in inches, and Log = base
10.
The dimensions a, c and
= winding width in inches, c = winding thickness in inches, a
= winding radius to centre of cross-section in inches, and Log = base
10.
The dimensions a, c and ![]() are identified in Figure A.1.
are identified in Figure A.1.
Appendix B
For those wishing to design their own class-E beacons for different loops, frequencies, or power levels, the following procedure was extracted from a paper by N. Sokal entitled "Class E Power Amplifier With Just One L and One C -Approximate Analysis" in the IEEE Journal of Solid State Circuits, Aug. ’81 (Vol. 16).
The general procedure is to build the loop first and determine its parallel resonant Q (Qres) and impedance (Rres) with the capacitors you will actually use (Cres). Qres can be determined by measuring the -3dB bandwidth. Rres is the product of Qres and the inductive (Xl) or capacitive (Xc) reactance. The following equations then tell you the optimum MOSFET duty cycle (duty ratio D) and where to place your tap on the loop for your chosen battery voltage (Vcc) and the average battery current (Icc) that you want.
![]()
where f = carrier frequency in Hz, and Qres = loaded Q of tuned circuit.
Rres = Q2p fLs
or ![]() ,W
,W
where Ls = loop inductance in H, and Cres = resonating capacitor in F.
X = 2p Qres ,dimensionless
![]()
where D = on/off duty ratio of MOSFET.
Now just pick the closest binary ratio as I did (1/16, 1/32, etc.) or use a monostable to get the exact value. D' = ratio you will actually use.
![]()
where Id peak = peak MOSFET drain current = approximately 2Icc/D' A, Ron = "on" resistance of MOSFET from spec sheet in W Rtap = resonant impedance at loop tap (from Vcc end).
Now the number of turns to the tap can be found:
![]()
where N = total loop turns, and Ntap = number of turns from Vcc end to tap.
The following equations will estimate the AC loop current:
![]()
Pout = Eeff Icc Vcc ,W
![]()
Vloop = Iloop 2pfLs ,V
where Eeff = proportion of battery power delivered to the load (loop+caps), Pout = power delivered to load (loop+caps) in W, Iloop = RMS current flowing in loop (for magnetic moment) in A, Magnetic Moment = Iloop N (area of loop) in a-t-m squared, Vloop = RMS voltage across loop (for voltage of capacitors) in volts.
Example
Using the above equations, plus a little guesswork,
I
designed a 48 inch diameter flexible (frameless) loop intended to be
stuffed
in a cave pack and dragged to remote areas. It consists of 18 turns of
no.14 stranded wire (about 1.84mm dia.) tapped 2 turns from the Vcc
end, about 3.5lbs weight. The following values are calculated. L=1193m
H, Q=36.4 approximately for loop alone or 26.9 with mylar
capacitors,
C=1.74m
F, optimum duty cycle 1/14, but 1/16 should be fine. With a 12V battery
Icc = 0.5A, Iloop = 1.9A RMS which gives
a magnetic moment of about 40 amp-turns- metres squared. Vloop
=
50V RMS. Note that I have not built this loop yet.
POSTSCRIPT:
I
actually built this loop and used it for a radiolocation in Jewel Cave
(USA) with a frame built by Paul Wightman. The only physical
change
was that it ended up 52 inches in diameter. I measured 1620 uh and
resonated
it with 1.595 uf. I used the same 1/16 duty cycle. I
measured
61 VRMS with .37 amps DC drain from a 12 V battery. This
corresponds
to a loop current of 1.71 Amps RMS and a Magnetic Moment of 44 A-T-M
squared,
close to the predictions. Peak MOSFET current is about 12 amps.
I later built a complete beacon
and loop which is now owned by Jewel Cave.
Editorial Note
The RS numbers quoted for some components refer to Radio Shack (USA), not RS Components (UK).