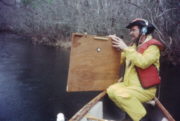
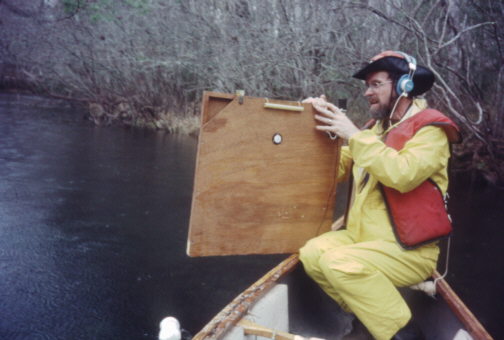
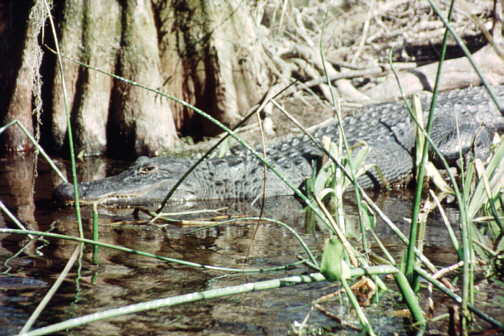
A Search along the Wakulla River |
There were some very real hazards! |
|
|
With the 300 foot (90 mtr) depth and the high electrical conductivity of the rock, good preparation was essential:
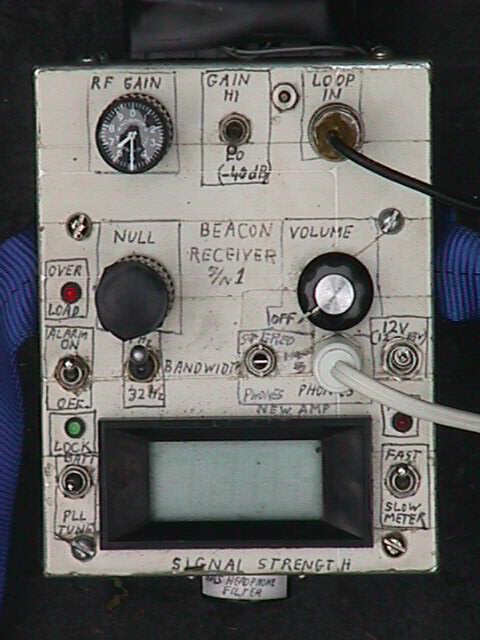
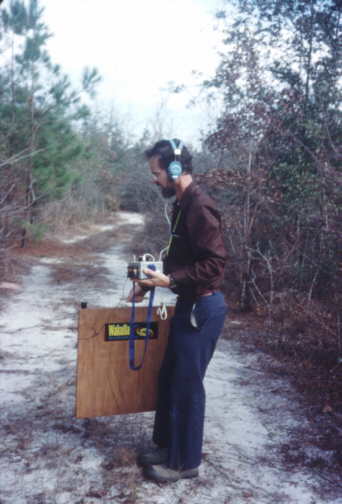
The Beacon
Receiver was relativly simple to operate when one just wanted to locate
the point directly over the Beacon in the cave (called Ground Zero).
The actual search process used to locate Ground Zero became easy with
practice.
|
|
Setting Up the Beacon Receiver
1) Be certain that the 9V batteries are good (and carry spares!). To check the batteries turn on the receiver and put the meter function switch in the "Batt" position. 1200 on the DVM means 12V. The DVM reads the voltage of both batteries in series but you must add 6V (600) to the reading to get the correct value which would be 18V in this case. A new pair of batteries will read 17-18V but for our purposes they can be used down to 10V or so. If the plan of the day calls for a long period of waiting it may be best to power the receiver from an external 12V battery of the same type used for the Beacon. The positive lead goes to the center pin of the power plug. When the Beacon finally comes on, the battery can simply be unplugged and picked up later. It is also worth doublechecking that the bubble level on the edge of the loop is accurate.
2) At the site, with good batteries, plug in the headphones (but not the loop) and turn the receiver on for a couple of minutes. The initial settings should be: RF Gain less than 5.0; Gain Low; Volume to suit; Alarm off; Bandwidth 32 Hz; Meter Switch in center position; Meter Fast. Adjust the Null Control for minimum audio tone (null). This should coincide closely with "000" on the meter. If the null does no go way down into the noise there is a second null adjustment inside the case that is accessable (with difficulty) from outside. You "tweek" this pot a bit, then re-null from the front panel etc until the null is deep. It is best to keep it out of the direct sun as much as possible as temperature changes affect the null. Battery voltage below 14V will also cause null drift, and it may shift slightly when the external 12V battery is unplugged.
3) Now plug in the loop and switch to Hi Gain. The receiver should
sould "alive" with noise from distant thunderstorms and power lines. If
the Beacon has turned on, you will hear a loud audio tone and the green
"Lock" LED will light. If the plan is to wait for the Beacon to come ON,
then simply place the loop flat on the ground; Turn the Alarm ON; switch
the Bandwidth to 1 Hz; and turn up the RF Gain to just below the point
where the red Overload LED flickers constantly. Turn the RF gain down if
you get too many false alarms from the local noise. It is not necessary
to listen with constantly with the headphones.
|
A Search along the Wakulla River |
There were some very real hazards! |
Finding Ground Zero
4) When the alarm sounds (or if the Beacon was already ON) shut off the alarm; put the receiver around your neck; pick up the loop by its handle and slowly rotate for a null. From now on don't worry about the Overload or Lock LED's. With experience you may find that you want to turn down the RF gain, but higher gain results in sharper nulls. Some people prefer to use the wide 32 Hz Bandwidth (despite all the noise) for searching because of the fast reaction time when nulling. Try both Bandwidths.
5) The Underground Beacon lies along the null line, but which direction?
6) At ground Zero the magnetic field comes vertically out of the
ground. At a short distance in any direction along the ground, the field
lines tilt slightly away from Ground Zero. As you make your final approach
to Ground Zero along your null line, occassionally rotate the loop perpendicular
to the line, then tilt it towards and away from you for a null. You should
be in the narrow 1Hz mode at this point. If the loop tilts towards you
then you have to walk a little further to reach Ground Zero. If it tilts
away, you have gone past it! Eventually you will find a spot where the
null will be perfectly vertical no matter what direction you rotate the
loop. Use as much RF gain as possible since high gain makes the null narrower.
7) If the null is not sharp disconnect the loop and try re-nulling the receiver following all the initial conditions of step 2 above. If the null is still not sharp then you have buried lines or metal, excessive atmospheric or powerline noise, a weak Beacon, or a defective loop or receiver. If the null is sharp in only one direction, and broad with the loop rotated 90 degrees, there may be a geologic anomaly known as anisotropy. This is very common at depths of 300 feet (90m) or more.
8) To pinpoint Ground Zero you must cancel out any errors in the Receive
loop. Pick a direction and rest the loop vertically on the ground,
holding it from one end. Now rock the loop slowly past vertical while
watching the bubble in the level to see if the loop is exactly vertical
when the null occurs. If the loop nulls while tilted slightly to the left
then move the loop slightly to the right and try again. Mark the spot where
the null is vertical, then rotate the loop 90degrees clockwise, find
the vertical null again, and mark the new spot. Repeat the process for
180 and 270 degrees. The 4 marks should form a square box with Ground Zero
in the center. If the box approaches one meter across, it is time to adjust
the level. At Wakulla the estimated horizontal accuracy of the location
of Ground Zero relative to the underwater Beacon was one meter on average.